Student guide
From sign-up to a published profile, step by step
This guide walks you through every screen: creating your account, filling in each part of your profile with real examples, confirming your Cyberpedia affiliation, submitting for review and what happens after approval. Follow it in order and you will not miss anything.
- Time needed
- About 45 minutes
- Cost
- Free
- Languages
- Arabic, English or both
- Review
- By the Cyberpedia team
Before you start
Have these ready. You can save and come back at any time: your profile stays private until it is approved.
- An email address you can open now (you will confirm it).
- The name of the Cyberpedia course or bootcamp you attended, and your cohort if you know it.
- A short headline and a paragraph about yourself (80 characters or more).
- One project or lab you did yourself: what it was, what you did, and the result.
- Optional: links to GitHub, LinkedIn, TryHackMe or Hack The Box, a photo, certificates.
The screenshots follow Sara Yousef, a fictional student in the SOC Analyst Bootcamp. Use her answers as a model, then write your own.
Part 1 · Create your account
Four short steps. You need your email inbox open.
Step 1: Fill in the sign-up form
RequiredOpen the site and choose "Create your profile" at the top, or go straight to the sign-up page. Fill in every field, tick both boxes, then press "Create account".
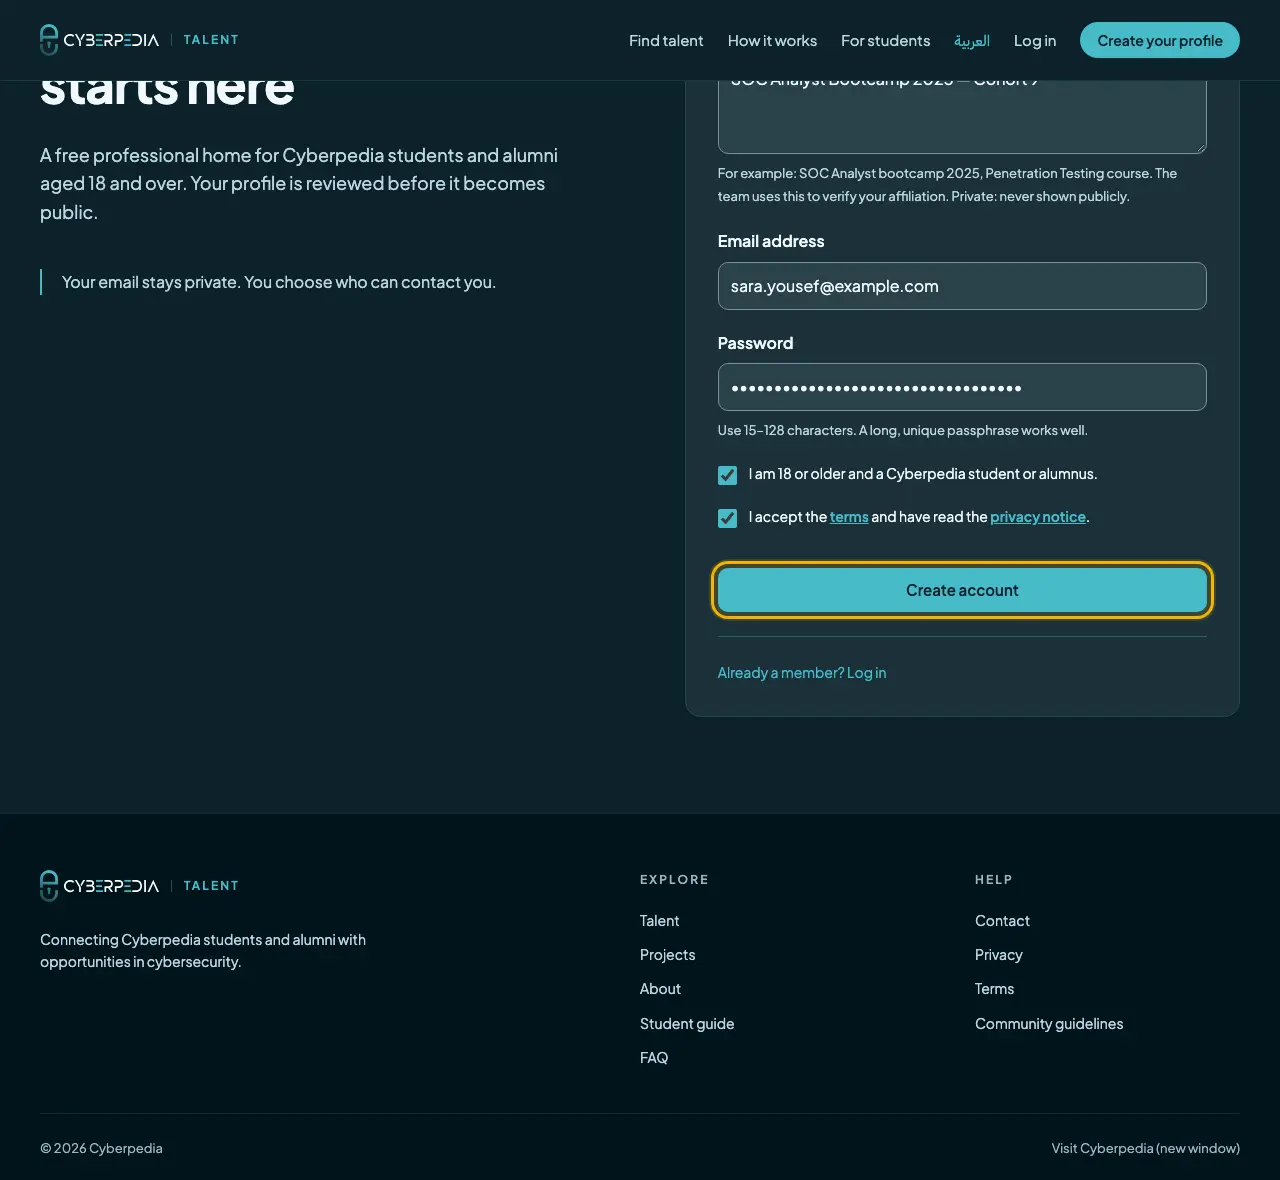
Example answers
- Your name
- Sara Yousef
- Cyberpedia courses or bootcamps you attended
- SOC Analyst Bootcamp 2025 — Cohort 9
- Email address
- sara.yousef@example.com
- Password
- 15 to 128 characters, for example a short sentence you will remember
- The courses field is private. The team uses it to confirm that you studied with Cyberpedia.
- The first box confirms you are 18 or older and a Cyberpedia student or graduate. The second accepts the terms and privacy notice.
Tip A long passphrase such as "my lab runs splunk every morning" is easier to remember and stronger than a short complex password.
Step 2: Check your inbox
RequiredYou will see "Check your email". We send a message titled "Verify your email — Cyberpedia Talent". It is in English and the link inside works for 24 hours.
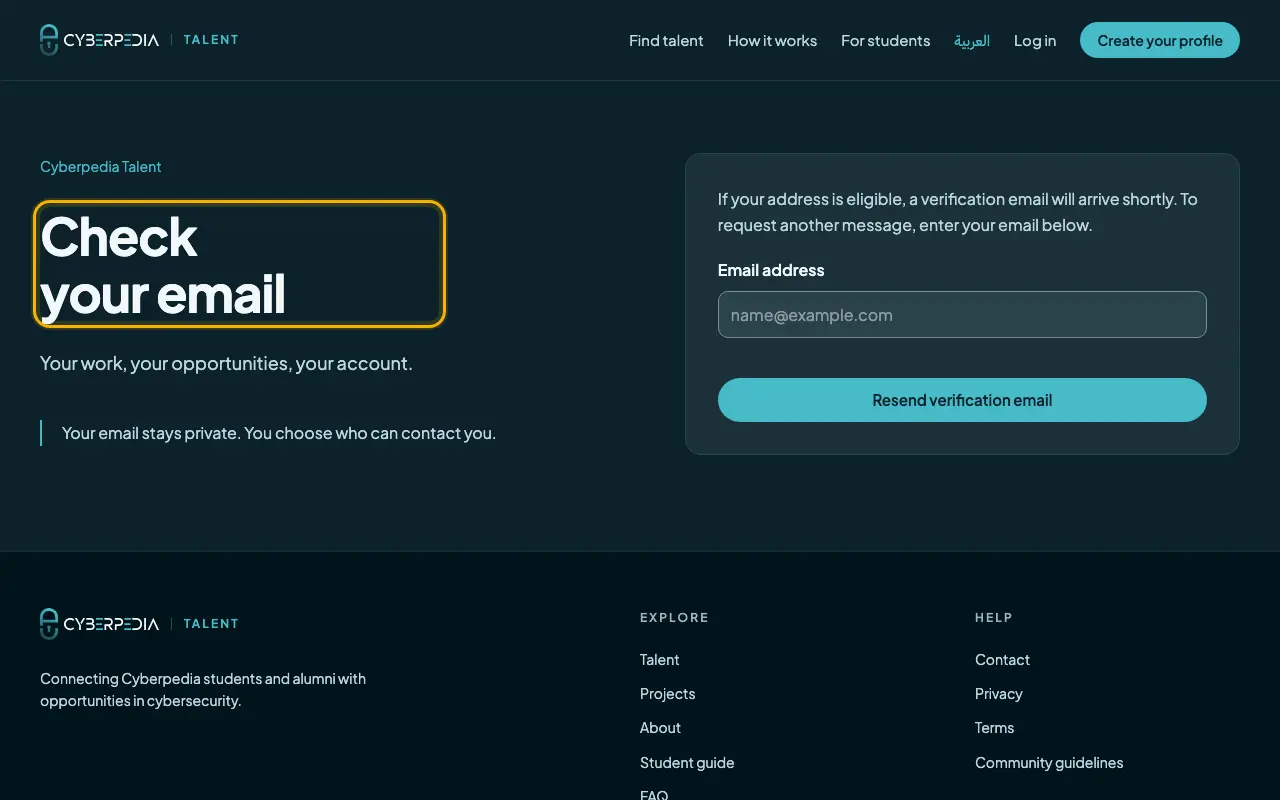
- Nothing after a few minutes? Look in Spam or Promotions.
- Still nothing: enter your email on the same page and press "Resend verification email".
Step 3: Confirm your email address
RequiredOpen the link in the email, then press "Confirm email". Opening the page alone does not confirm it: you must press the button.
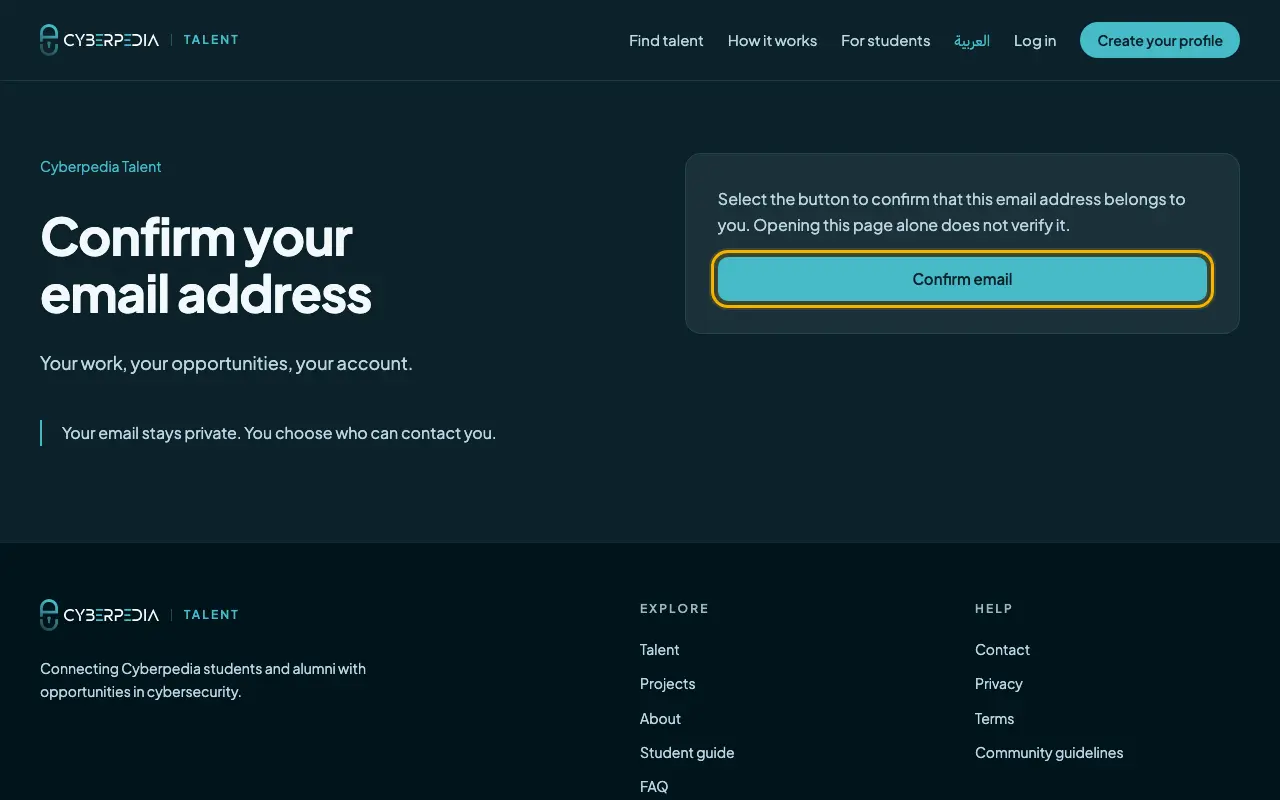
Tip If the link expired, the page offers "Request a new link". Use it and open the newest email.
Step 4: Log in
RequiredEnter your email and password and press "Log in". You arrive at your dashboard.
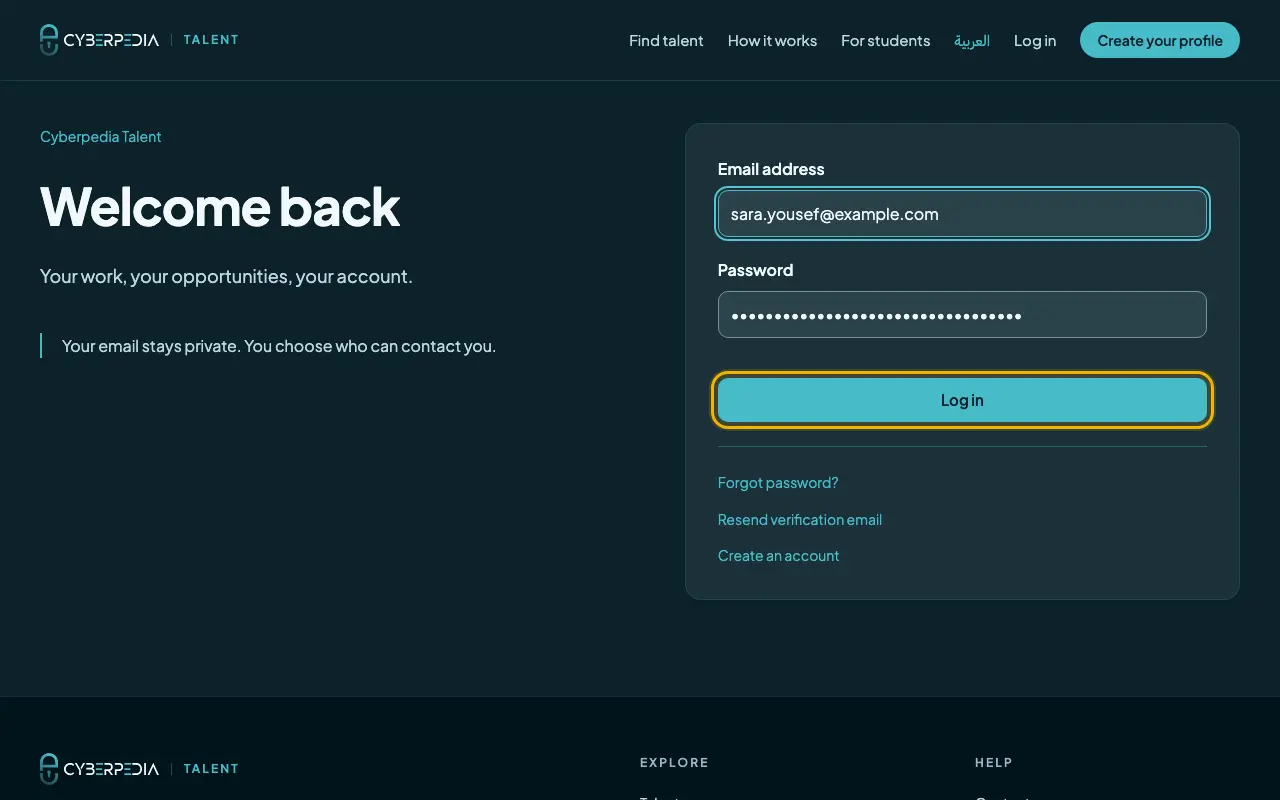
- Forgot your password? Use "Forgot password?" under the form. The reset link works for 30 minutes.
- If you turned on two-factor authentication, you will be asked for the 6-digit code from your authenticator app.
Part 2 · Build your profile
Your profile is private while you write it. Most sections save automatically: watch for "Profile draft saved" at the top. Projects, your affiliation and visibility have their own Save buttons.
Step 5: Get to know your dashboard
OptionalThe dashboard shows how complete your profile is, your review status and "Your next steps". Press "Continue profile" to jump to the first unfinished section. The menu on the side lists every section of your profile.
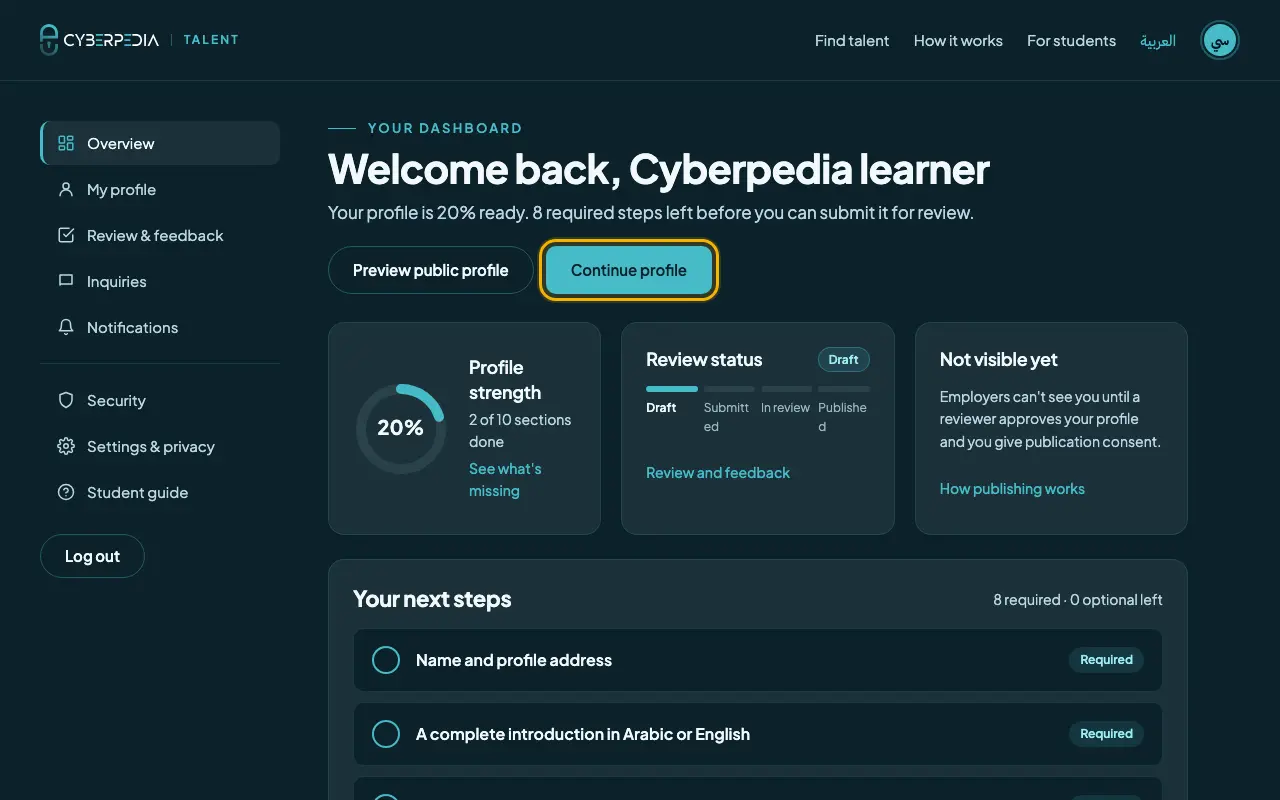
- "Required" sections must be complete before you can submit. "Optional" ones make your profile stronger.
Step 6: Introduction: your name and profile address
RequiredIn "Introduction", write your display name, your name in the other alphabet, and choose a profile handle. The handle becomes your public address, for example talent.cyberpedia.site/en/talent/sara-yousef.
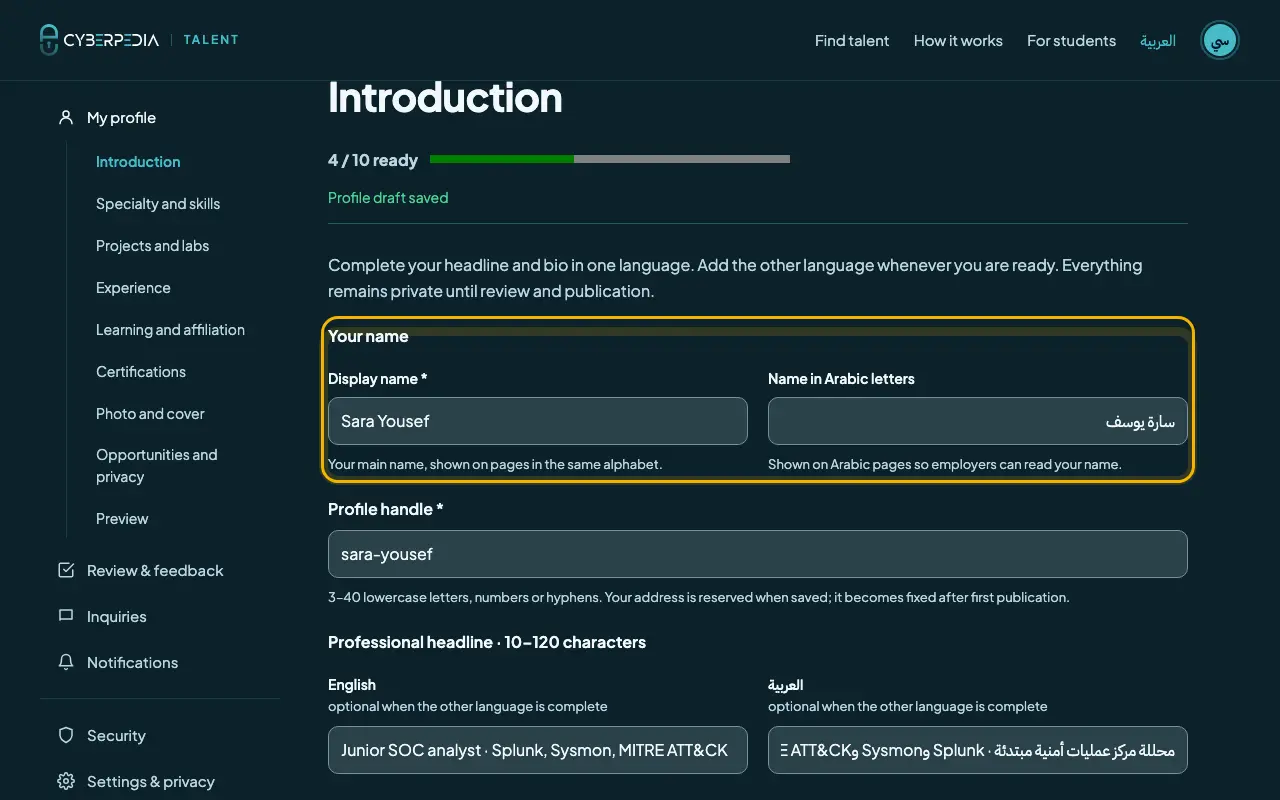
Example answers
- Display name
- Sara Yousef
- Name in Arabic letters
- سارة يوسف
- Profile handle
- sara-yousef
- The handle uses 3–40 lowercase English letters, numbers or hyphens. It cannot be changed after your profile is first published.
- Write each name in the correct alphabet: the Arabic name in Arabic letters, the English name in English letters. Submission is blocked otherwise.
Step 7: Introduction: headline and about you
RequiredEach text field has an English and an Arabic box. Complete at least one language fully; adding the other helps employers who read that language.
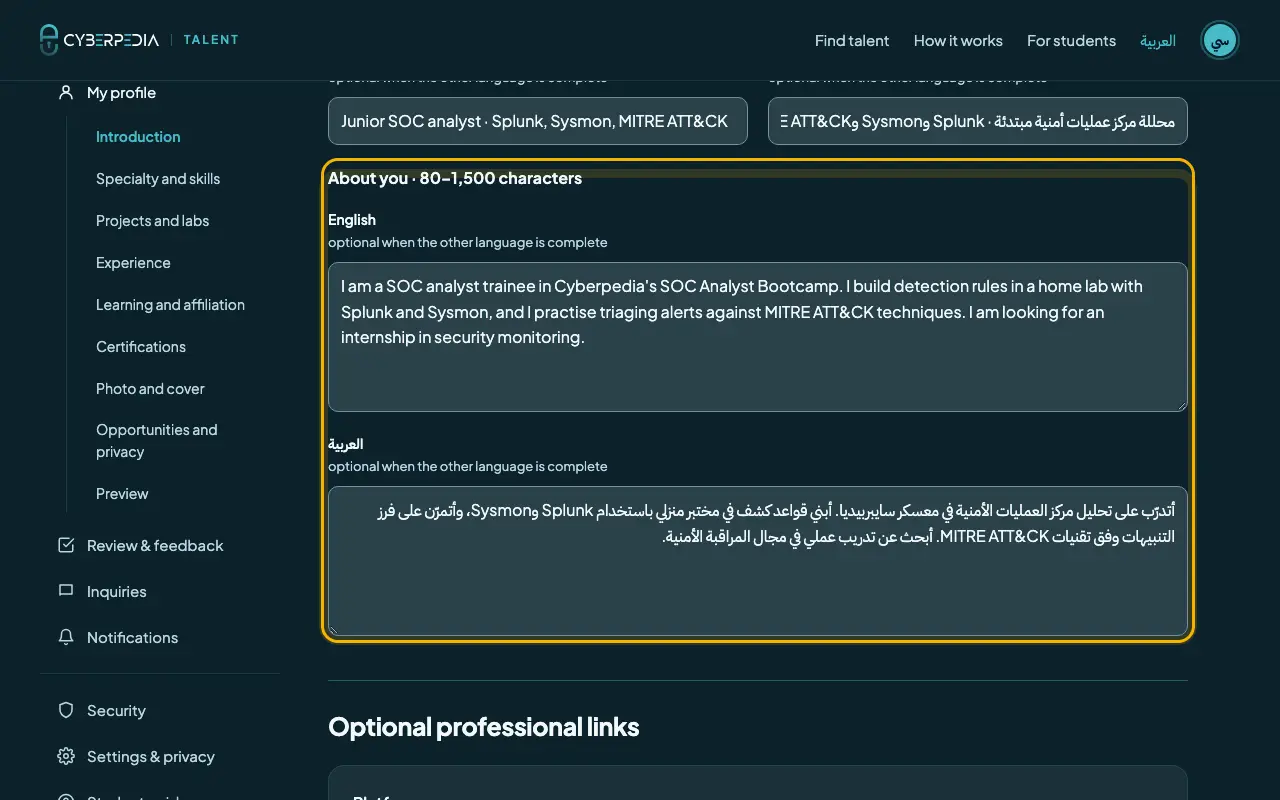
Example answers
- Professional headline · 10–120 characters
- Junior SOC analyst · Splunk, Sysmon, MITRE ATT&CK
- About you · 80–1,500 characters
- I am a SOC analyst trainee in Cyberpedia's SOC Analyst Bootcamp. I build detection rules in a home lab with Splunk and Sysmon, and I practise triaging alerts against MITRE ATT&CK techniques. I am looking for an internship in security monitoring.
Tip A good "About you" answers three questions: what you are learning, what you have actually done, and what opportunity you want.
Step 8: Introduction: professional links (optional)
OptionalPress "Add professional link", choose the platform and paste the full https:// address. Choose "Other" for any platform not in the list and give it a name. You can add up to 8 links.
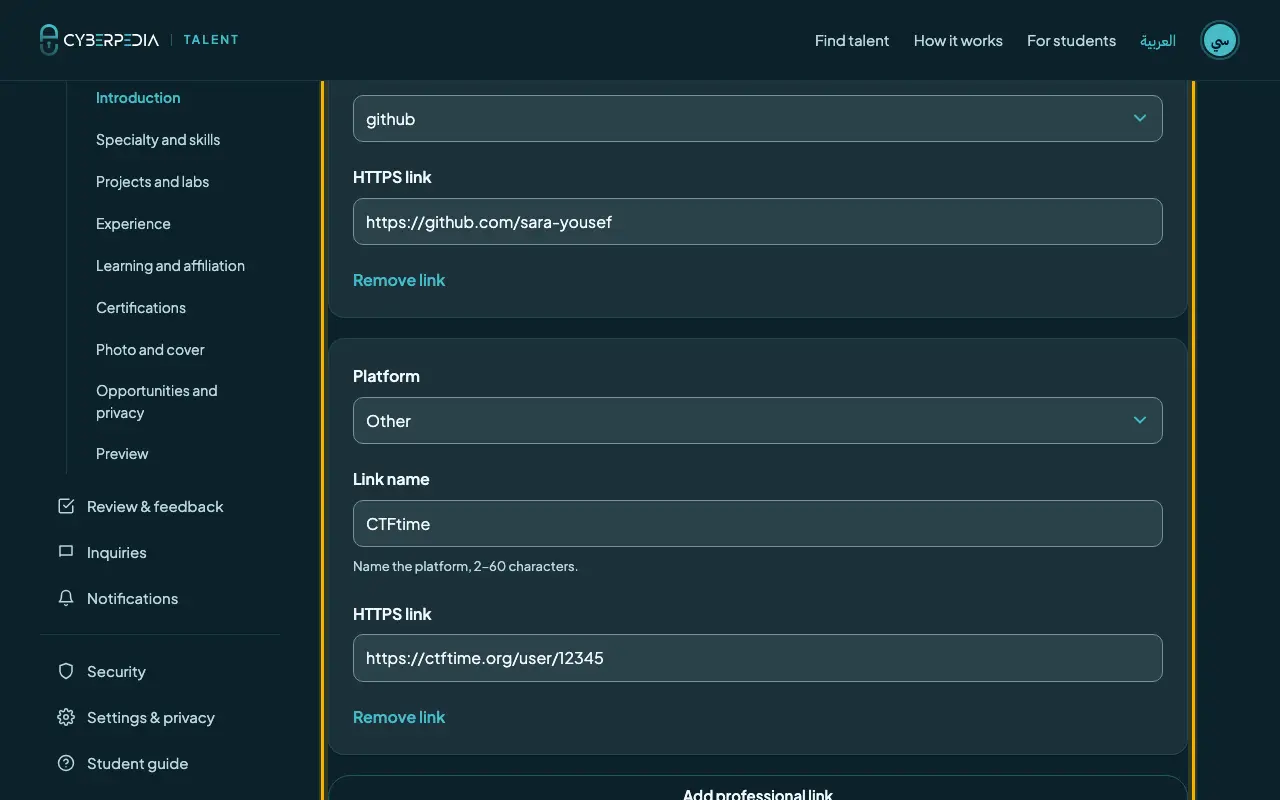
Example answers
- GitHub
- https://github.com/sara-yousef
- TryHackMe
- https://tryhackme.com/p/sarayousef
- Other → Link name: CTFtime
- https://ctftime.org/user/12345
Step 9: Specialty and skills
RequiredChoose your main specialty. If yours is not listed, choose "Other" and type it. You can add up to 2 more specialties. Then pick 3 to 10 skills in total; to add a skill that is not listed, type it under "Your own skills" and press "Add skill".
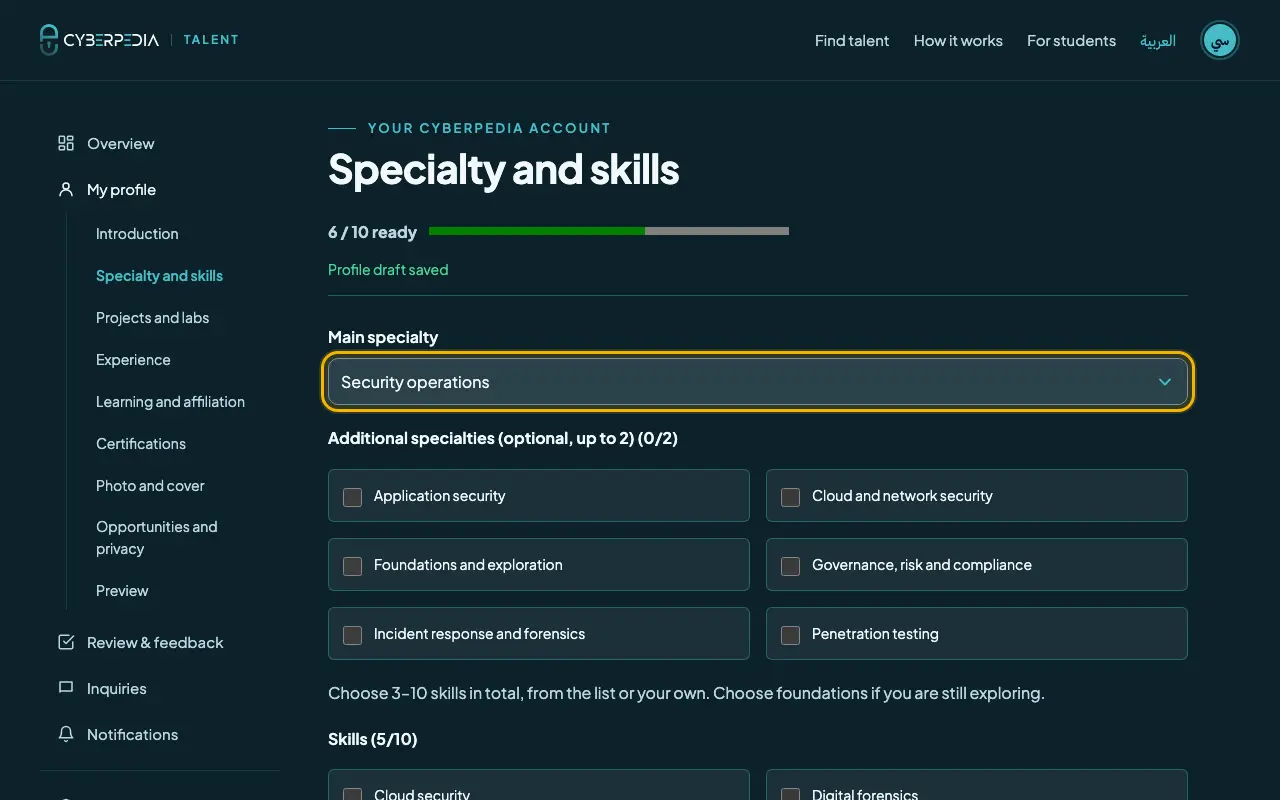
Example answers
- Main specialty
- Security operations
- Skills
- SIEM, Incident response, Linux, Networking + your own: Wireshark
Tip Only choose skills you can talk about in an interview. Five honest skills beat ten guesses.
Step 10: Projects and labs: describe one piece of work
RequiredOpen "Projects and labs" and press "Add project or lab". You need at least one complete project. Labs, home labs, capstones and supervised assessments all count; simulated work is welcome.
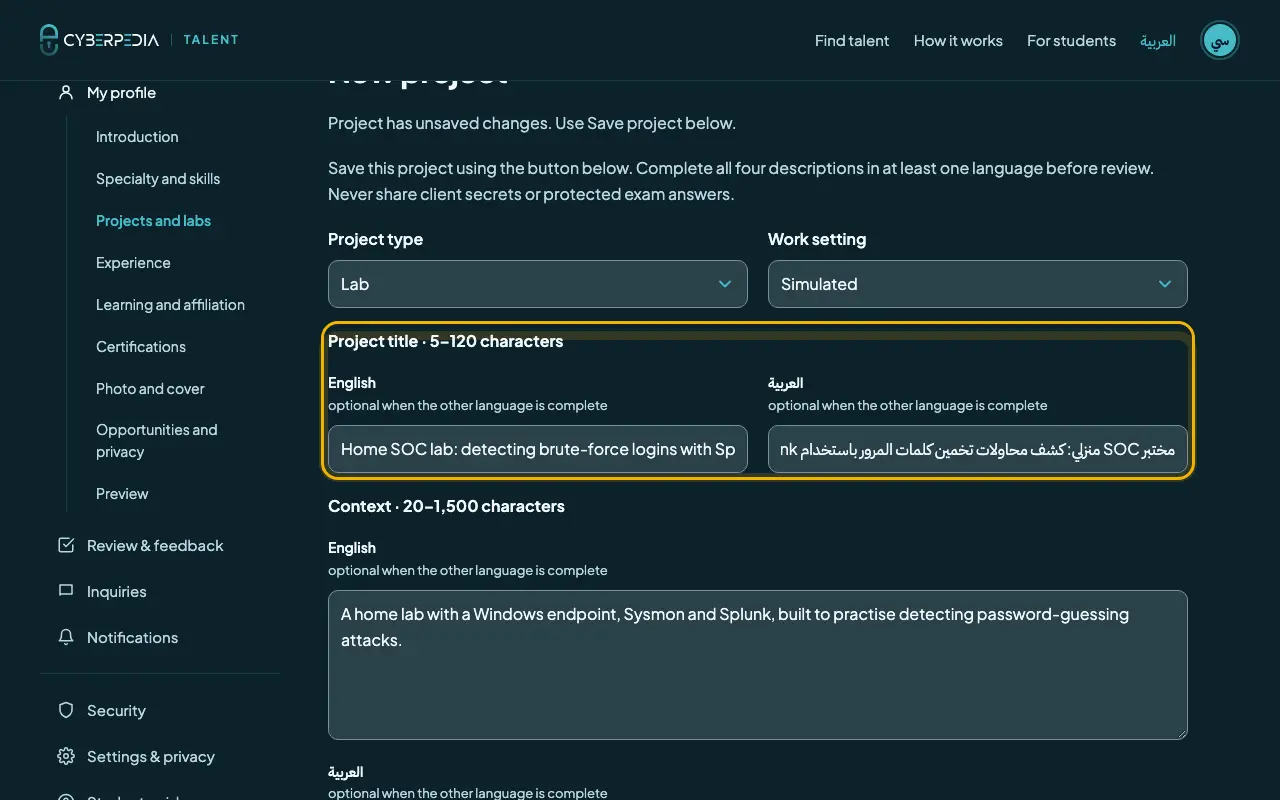
Example answers
- Project title · 5–120 characters
- Home SOC lab: detecting brute-force logins with Splunk
- Context · 20–1,500 characters
- A home lab with a Windows endpoint, Sysmon and Splunk, built to practise detecting password-guessing attacks.
- Your contribution · 20–2,000 characters
- I set up the lab, generated failed logins with Hydra, and wrote a Splunk search and alert that flags more than 10 failures in 5 minutes.
- Outcome · 20–1,500 characters
- The alert caught every simulated attack with no false positives over a week of normal use. I documented the rule and a triage checklist.
- Project month
- August 2026
- Skills or tools
- Splunk, Sysmon, Hydra, Windows
- Choose the project type (Lab, Capstone, Personal, Open source, Authorized client work, or Other with your own name) and the work setting (Independent, Simulated or Supervised).
- Add up to 3 https:// evidence links (GitHub repository, write-up, report) and up to 3 images. Every image needs a short description.
Important Never share client secrets, passwords, real victim data or protected exam answers.
Step 11: Tick permission and save the project
RequiredTick "I have permission to share this work and its evidence." and press "Save project". Projects do not save automatically, so do not leave the page before saving.
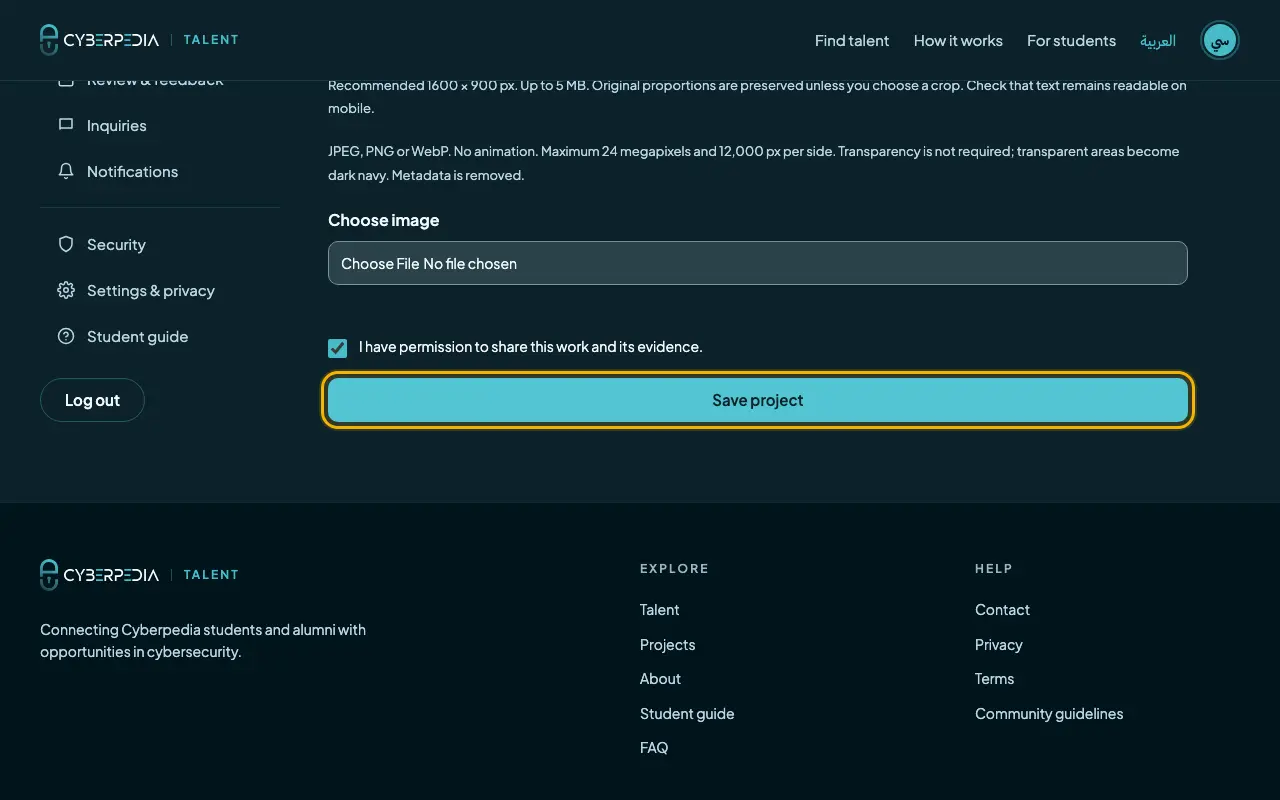
Step 12: Your project list
OptionalSaved projects appear in the list. Use "Edit project" to improve one later. You can add up to 10, but one strong project is enough to submit.
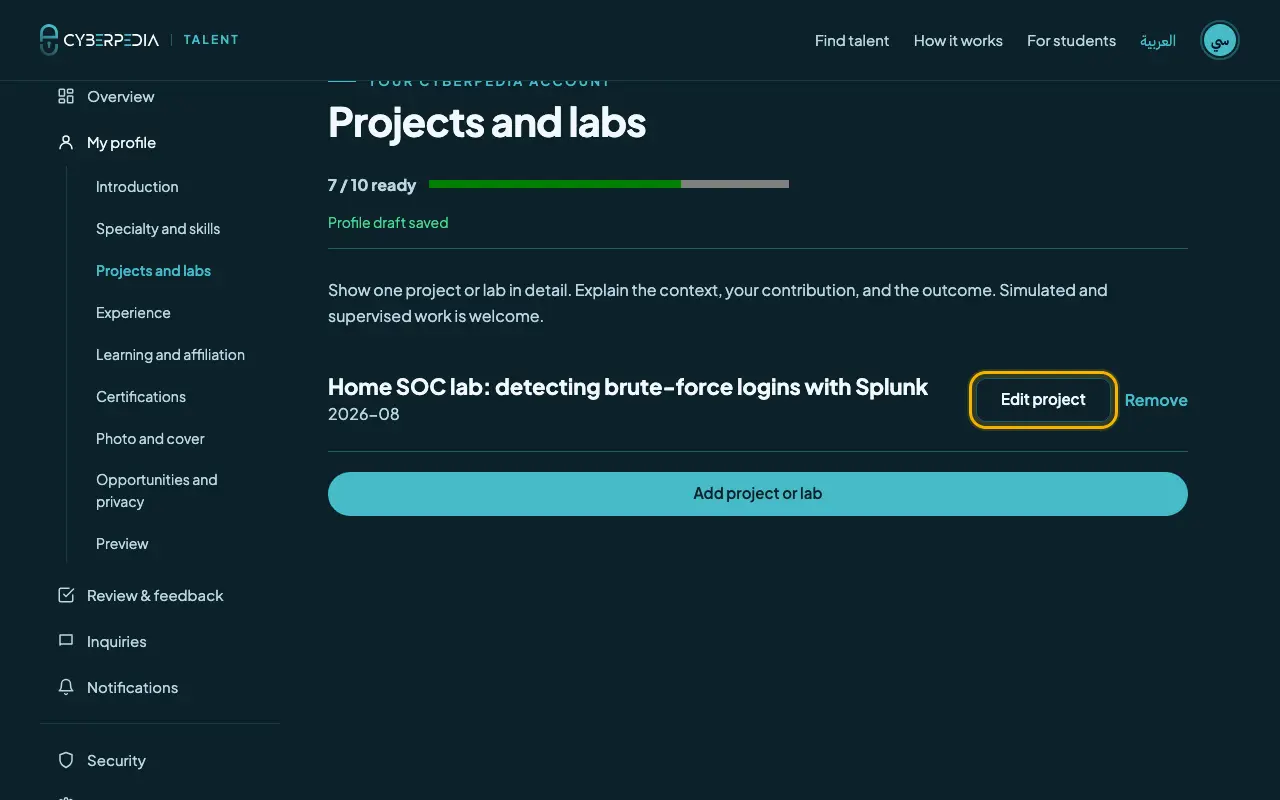
Step 13: Experience (optional)
OptionalAdd real jobs, internships, freelance work or volunteering with "Add record". If you add a record, fill in the organization, role and type. Simulated work belongs in projects instead.
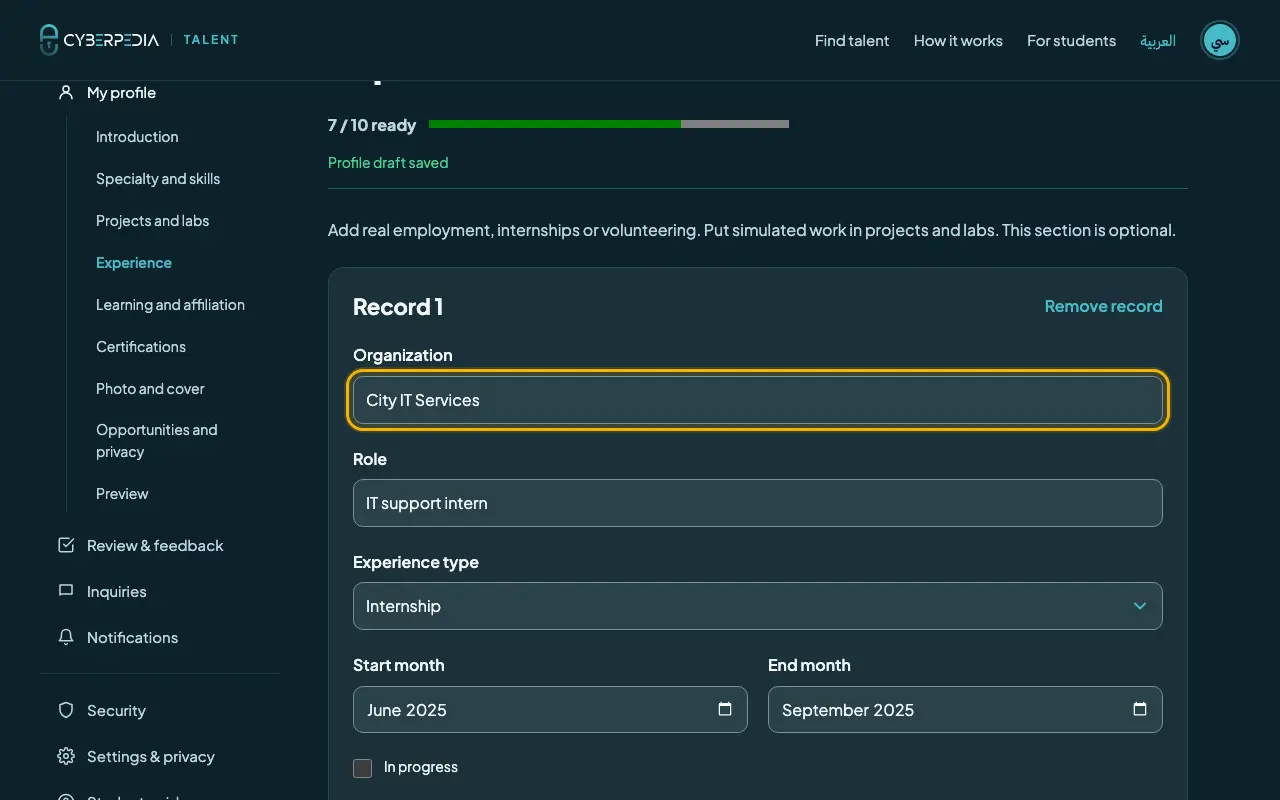
Example answers
- Organization
- City IT Services
- Role
- IT support intern
- What you did
- Handled helpdesk tickets, reset accounts in Active Directory, and documented recurring phishing reports for the security team.
Step 14: Learning and affiliation: confirm you studied with Cyberpedia
RequiredThis is the step students most often miss. Open "Learning and affiliation". Under "Cyberpedia affiliation · private", choose your relationship with Cyberpedia, write your course or cohort, then press "Save private affiliation".
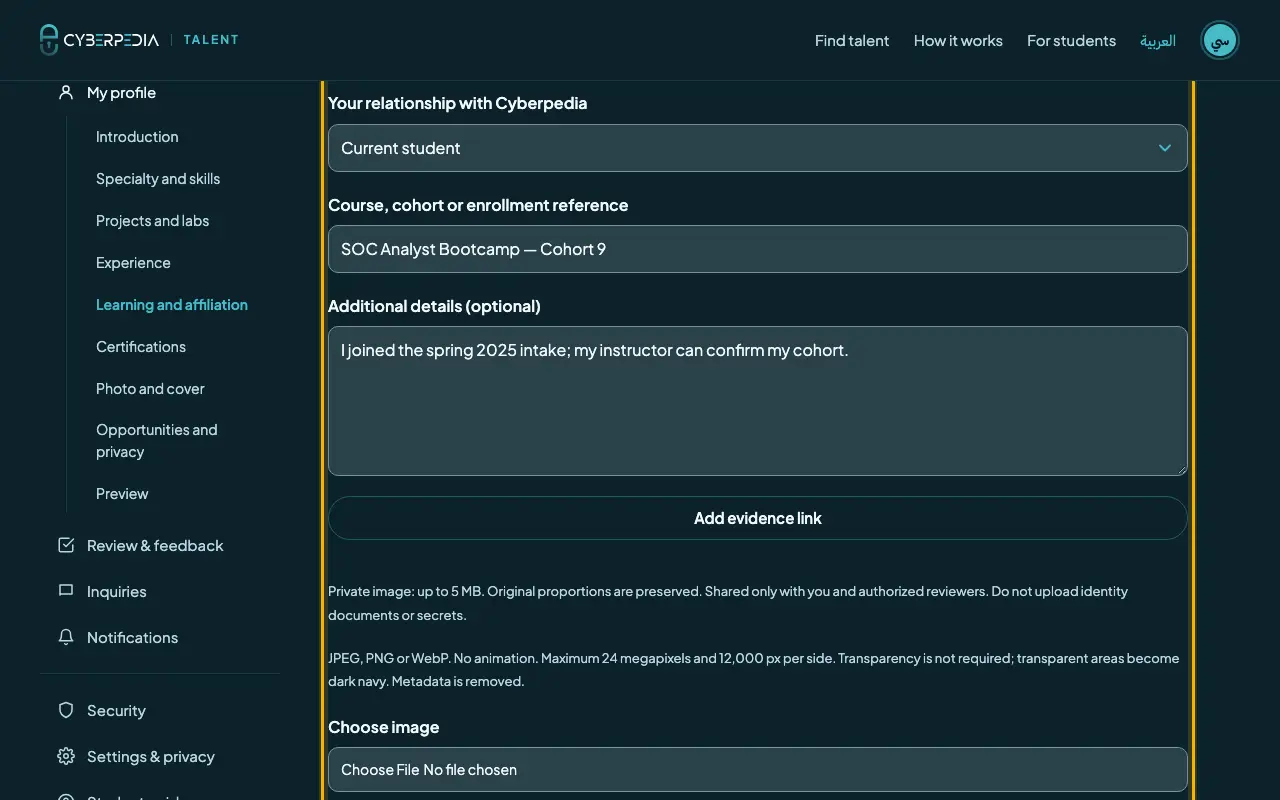
Example answers
- Your relationship with Cyberpedia
- Current student (or Alumni if you finished)
- Course, cohort or enrollment reference
- SOC Analyst Bootcamp — Cohort 9
- Additional details (optional)
- I joined the spring 2025 intake; my instructor can confirm my cohort.
- Only you and the review team can see this section. It never appears on your public profile.
- You can add up to 3 evidence links or private images, for example an enrollment email or certificate. Do not upload identity documents.
- Its status starts as Pending. The reviewer verifies it while reviewing your profile.
Important Without a saved affiliation your profile cannot be approved, even if everything else is perfect.
Step 15: Certifications (optional)
OptionalAdd certificates with "Add record". If you add one, fill in its title, issuer and issue month. A verification link is optional; the credential ID stays private unless you choose to show it.
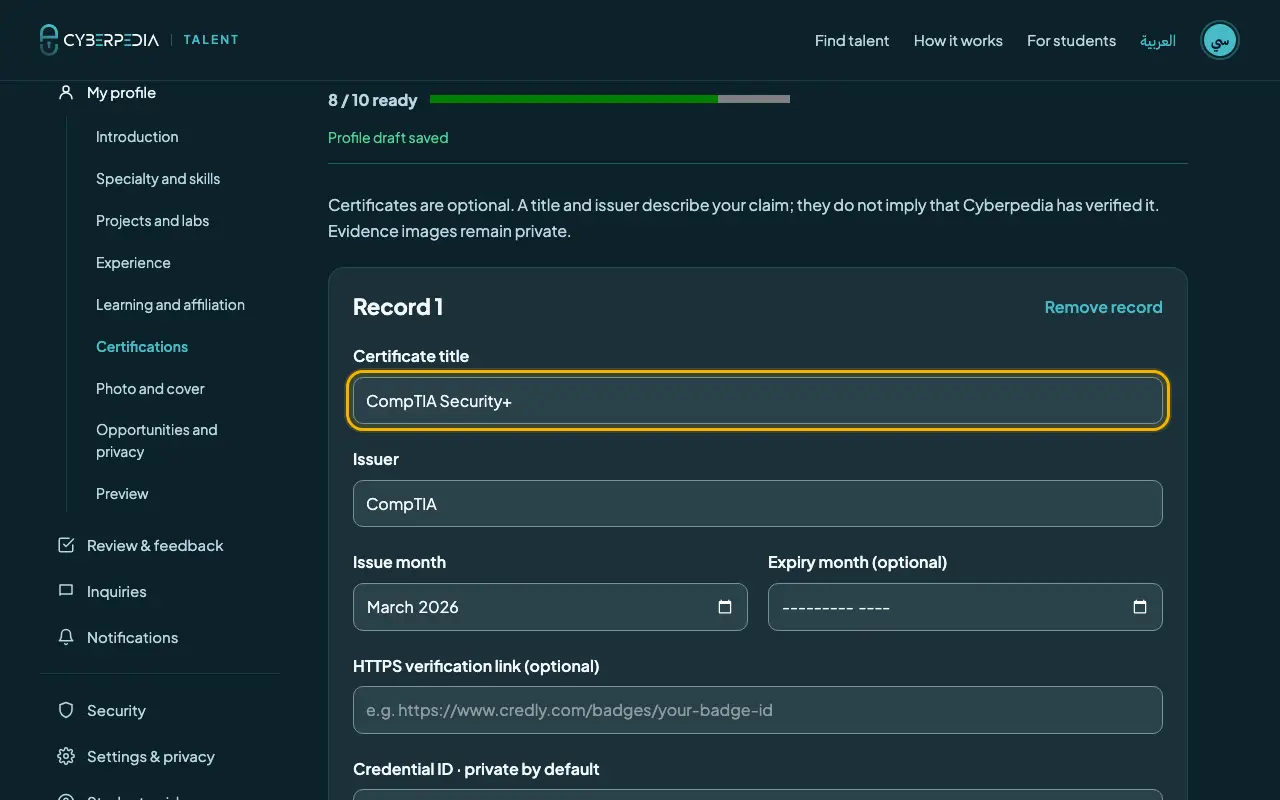
Example answers
- Certificate title
- CompTIA Security+
- Issuer
- CompTIA
- Issue month
- March 2026
Step 16: Photo and cover (optional)
OptionalUpload a professional photo and a cover image, or keep the default initials and Cyberpedia cover. Press "Choose image", adjust the crop, then "Upload this image".
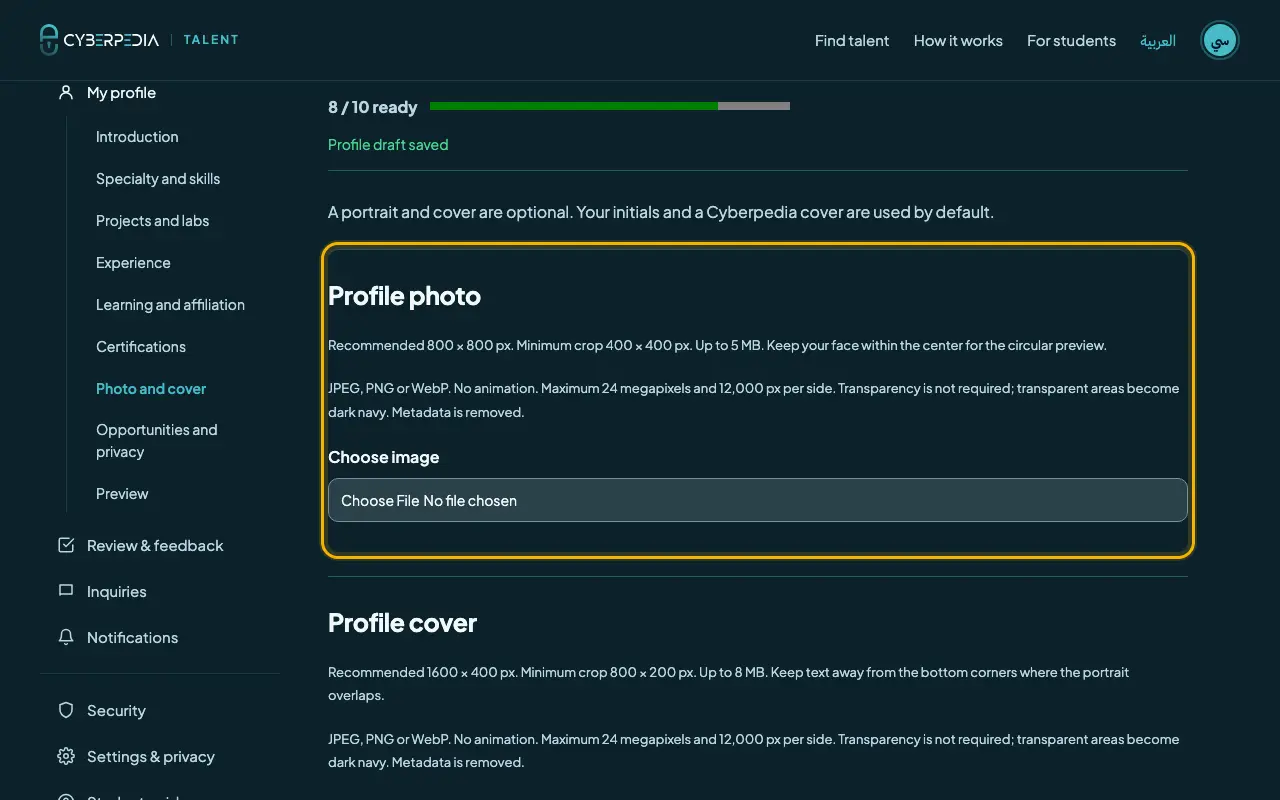
- Photo: JPEG, PNG or WebP, ideally 800 × 800 px, up to 5 MB, cropped square.
- Cover: ideally 1600 × 400 px, up to 8 MB. Keep text away from the bottom corners.
Step 17: Opportunities, work arrangements and languages
RequiredIn "Opportunities and privacy", tick at least one opportunity type and one work arrangement, then add at least one spoken language with its level ("Add spoken language").
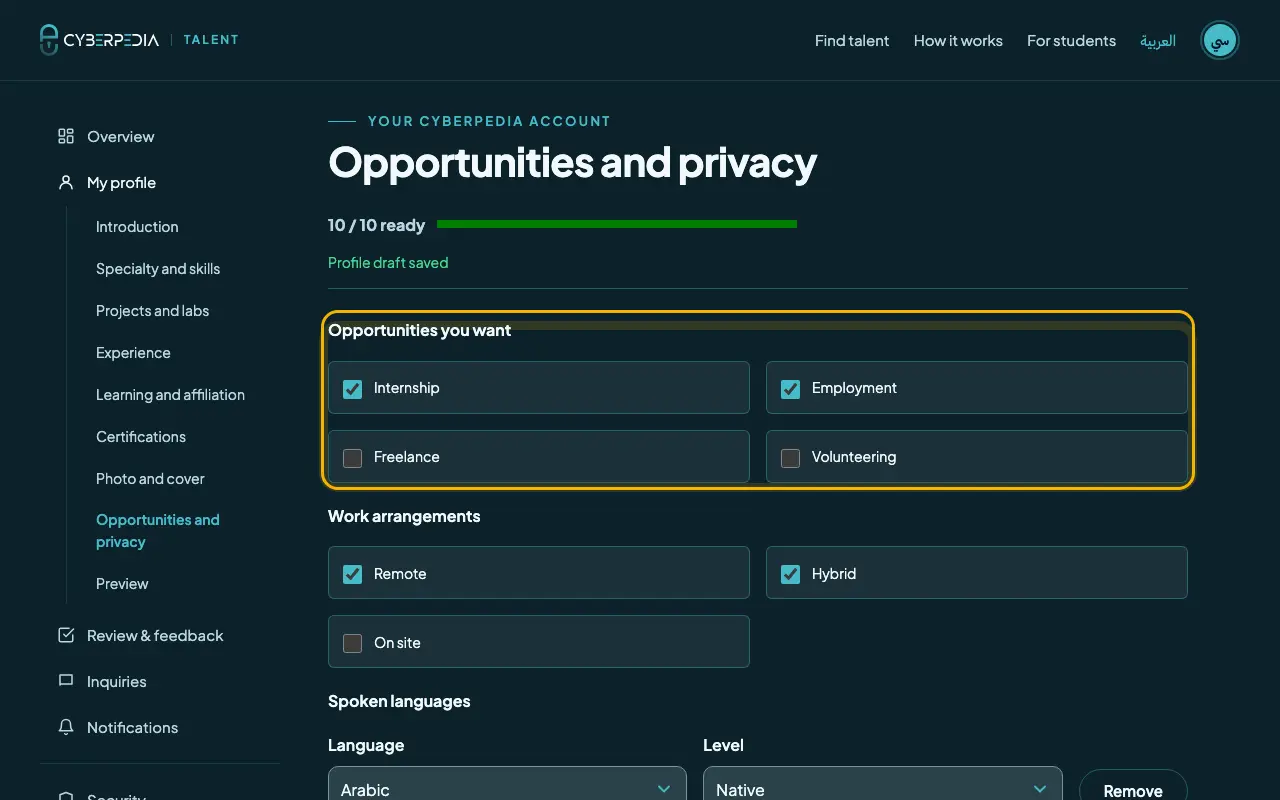
Example answers
- Opportunities you want
- Internship, Employment
- Work arrangements
- Remote, Hybrid
- Spoken languages
- Arabic — Native · English — Advanced
Tip Location is optional and coarse: a two-letter country code (for example SY) and a city. Never add a street address.
Step 18: Visibility and availability
OptionalLower on the same page, "Hide my profile" is ticked at first. You do not need to change it: your profile becomes public automatically once it is reviewed and approved. Choose your availability and press "Save visibility and availability" if you change anything here.
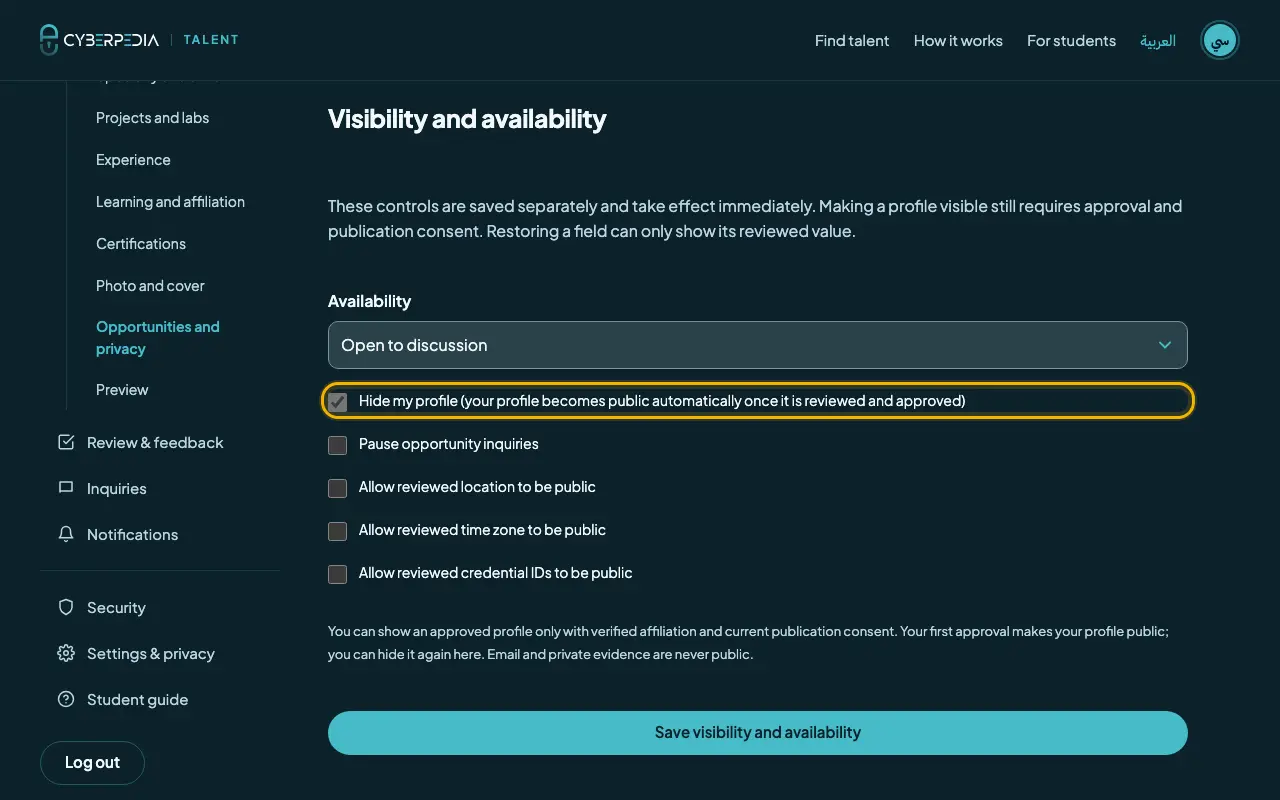
- After approval you can hide your profile at any time by ticking the box again.
- "Pause opportunity inquiries" stops new messages without hiding your profile.
Part 3 · Submit and get reviewed
A Cyberpedia reviewer reads your profile, checks your affiliation and decides. You are notified on your dashboard and by email.
Step 19: Preview your profile
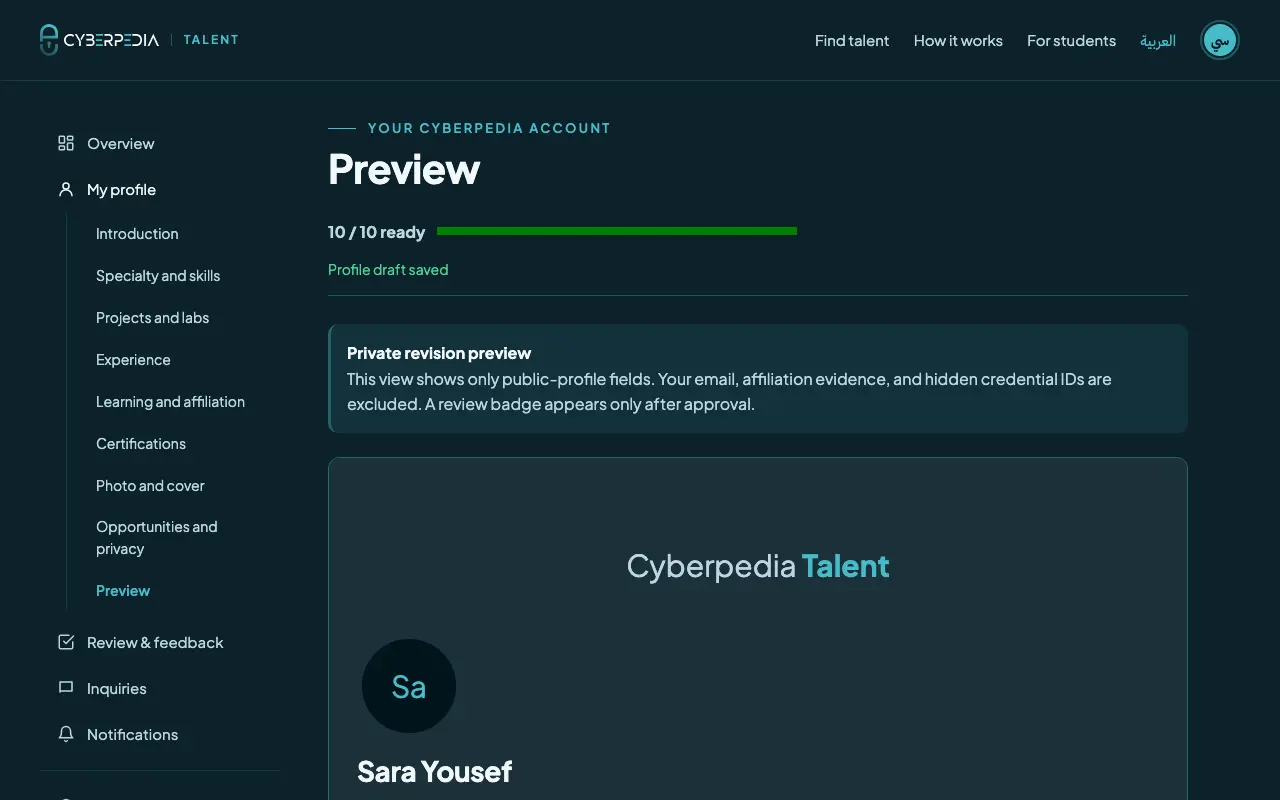
OptionalOpen "Preview" to see exactly what employers will see. Your email, your affiliation evidence and hidden credential IDs are never shown.
Step 20: Make the checklist 10 / 10
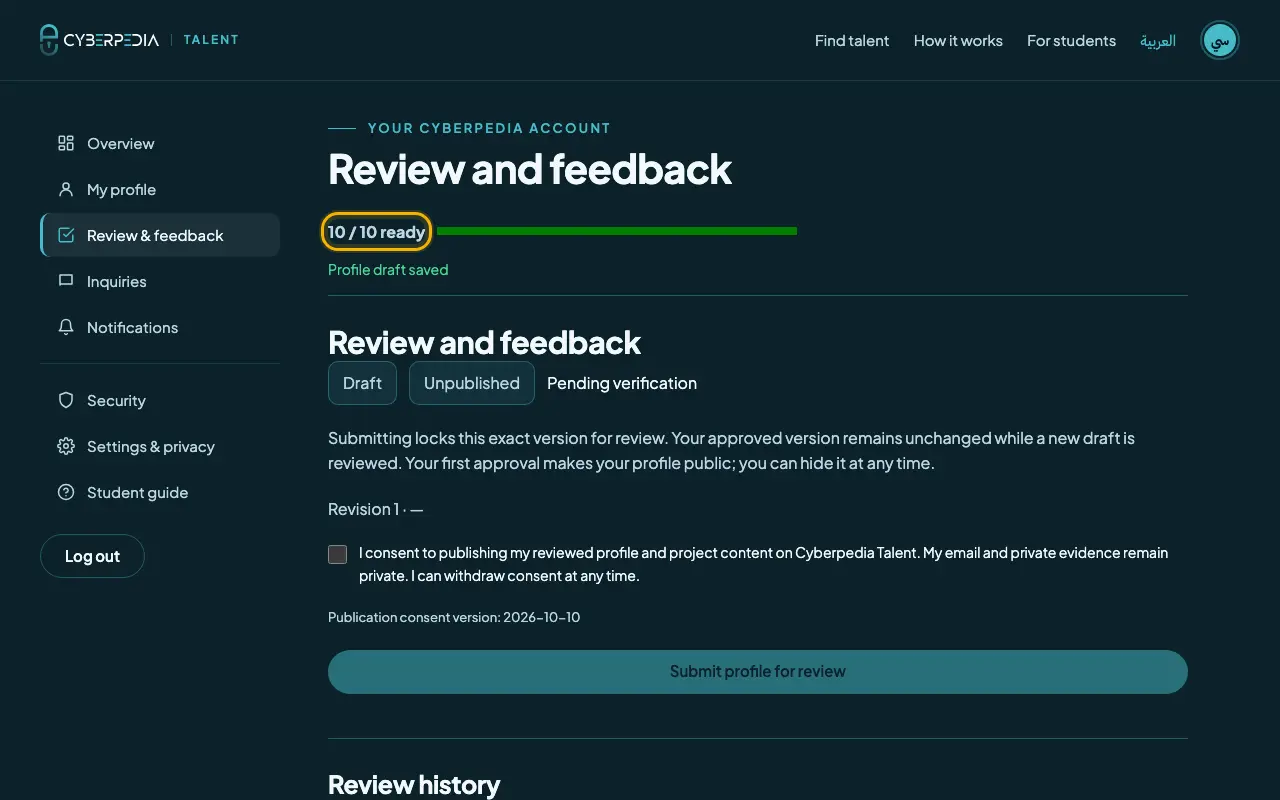
RequiredOpen "Review & feedback". The checklist shows what is still missing. Every item must be complete before you can submit. Use the table further down this guide to find where to fix each item.
Step 21: Give consent and submit
RequiredTick the consent box ("I consent to publishing my reviewed profile and project content…") and press "Submit profile for review".
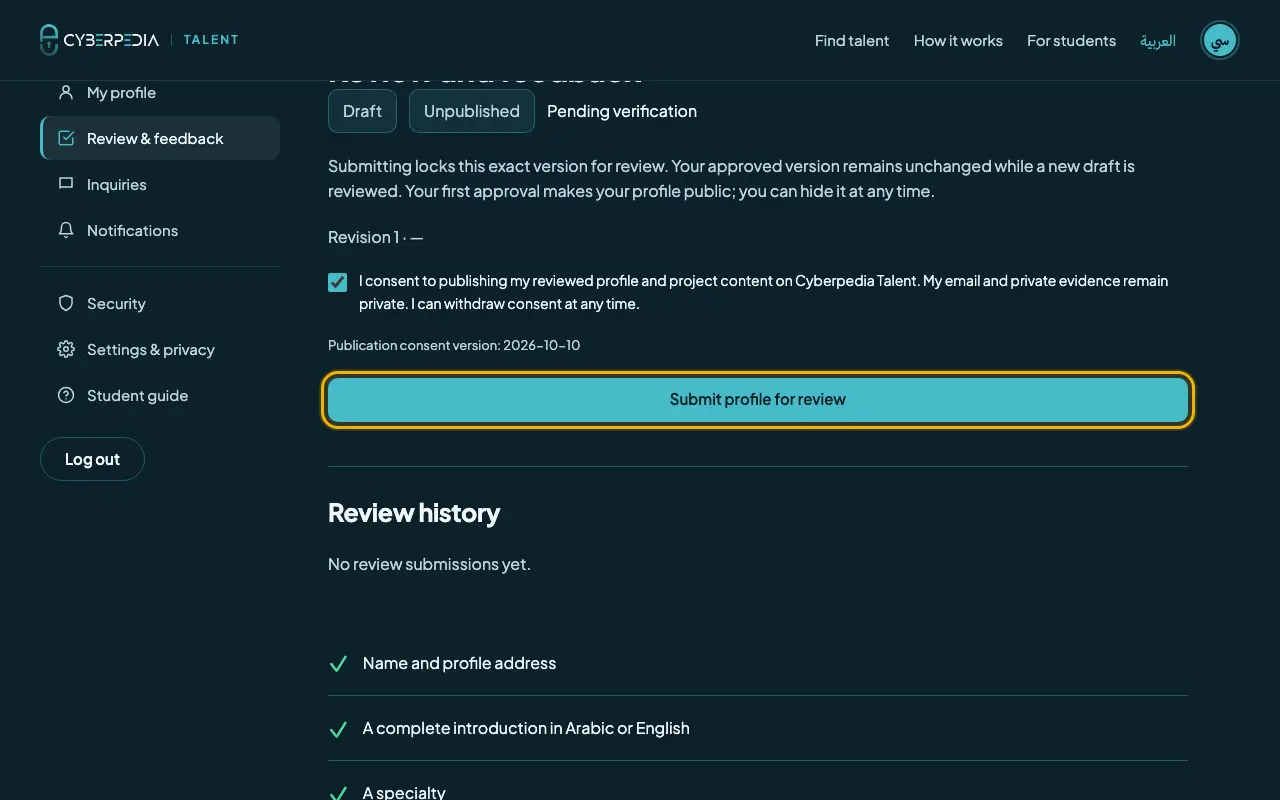
- Submitting locks this version. You cannot edit it while it is being reviewed.
- Made a mistake? Press "Withdraw submission": you get an editable copy back and can submit again.
Step 22: Wait for the review
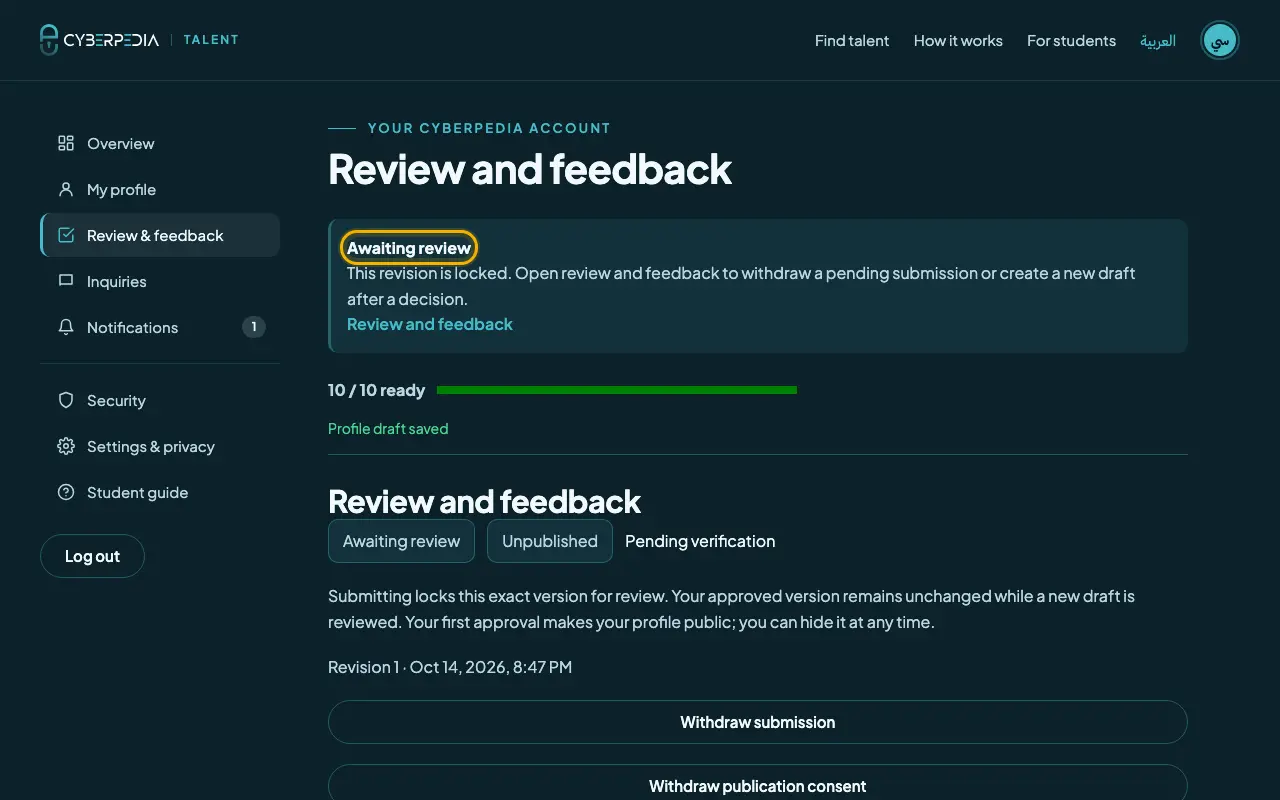
OptionalYour status shows "Awaiting review" and your affiliation "Pending verification". You will receive an email titled "Profile update — Cyberpedia Talent" and a dashboard notification when there is a decision.
Step 23: If changes are requested
OptionalThe reviewer explains what to improve, section by section. Press "Create a new draft", apply the feedback, then submit again from "Review & feedback".
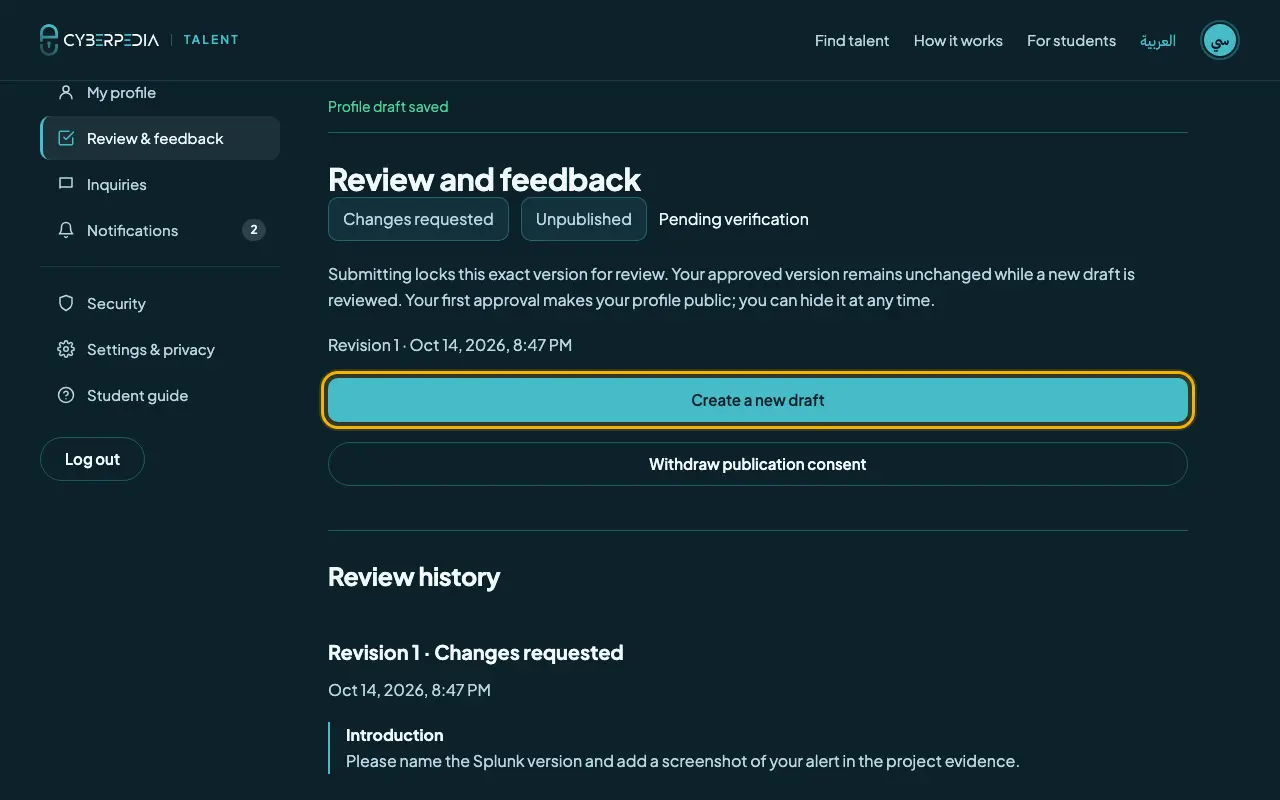
- A rejection also comes with an explanation and a next step: resubmit after changes, or contact support.
- If only your affiliation needs attention, the reason appears under "Affiliation feedback" in "Learning and affiliation".
Step 24: Approved: your profile is live
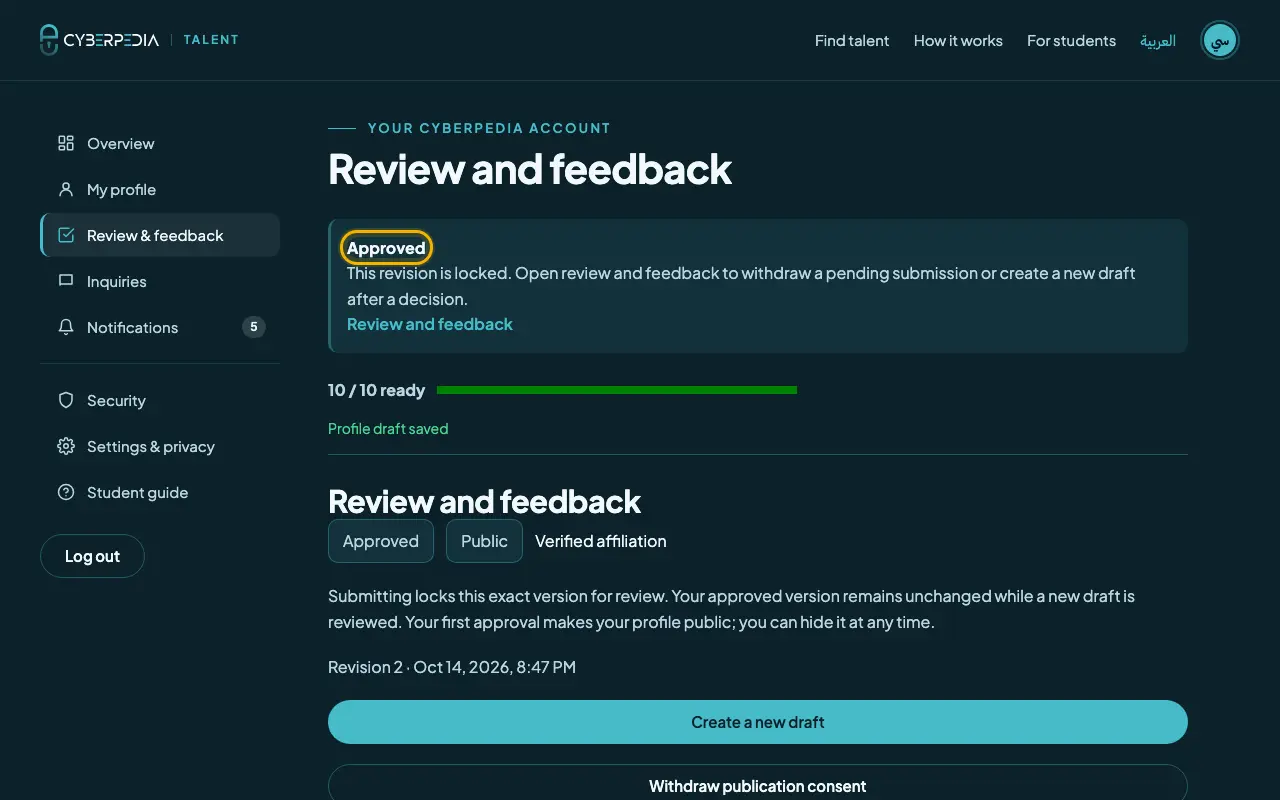
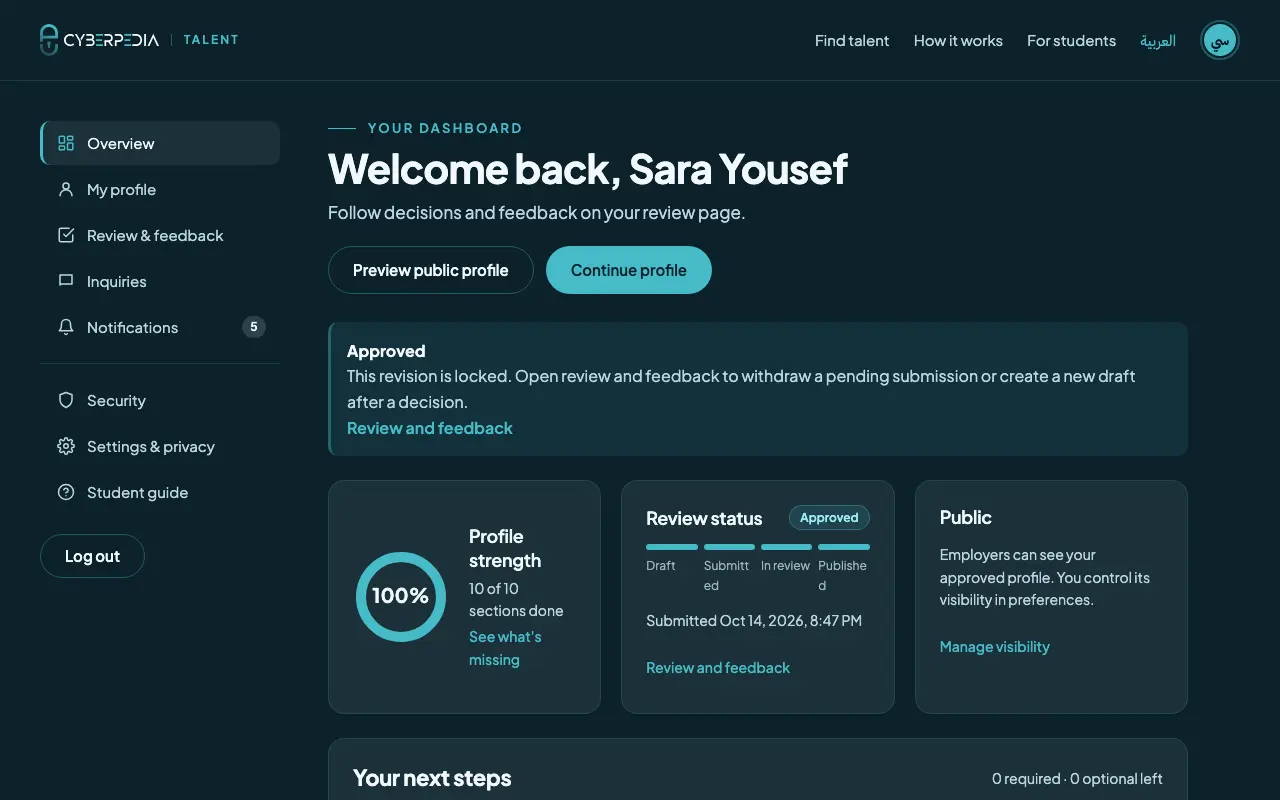
OptionalWhen the reviewer approves, your affiliation is verified and your profile becomes public straight away. The status shows "Approved" and "Public".
Part 4 · After you are published
Keep your profile up to date and answer opportunities safely.
Step 25: Your dashboard after approval
OptionalThe dashboard now shows "Public". To change your profile, open "Review & feedback" and press "Create a new draft". Your live profile stays as it is until the new version is approved.
Step 26: Your public profile
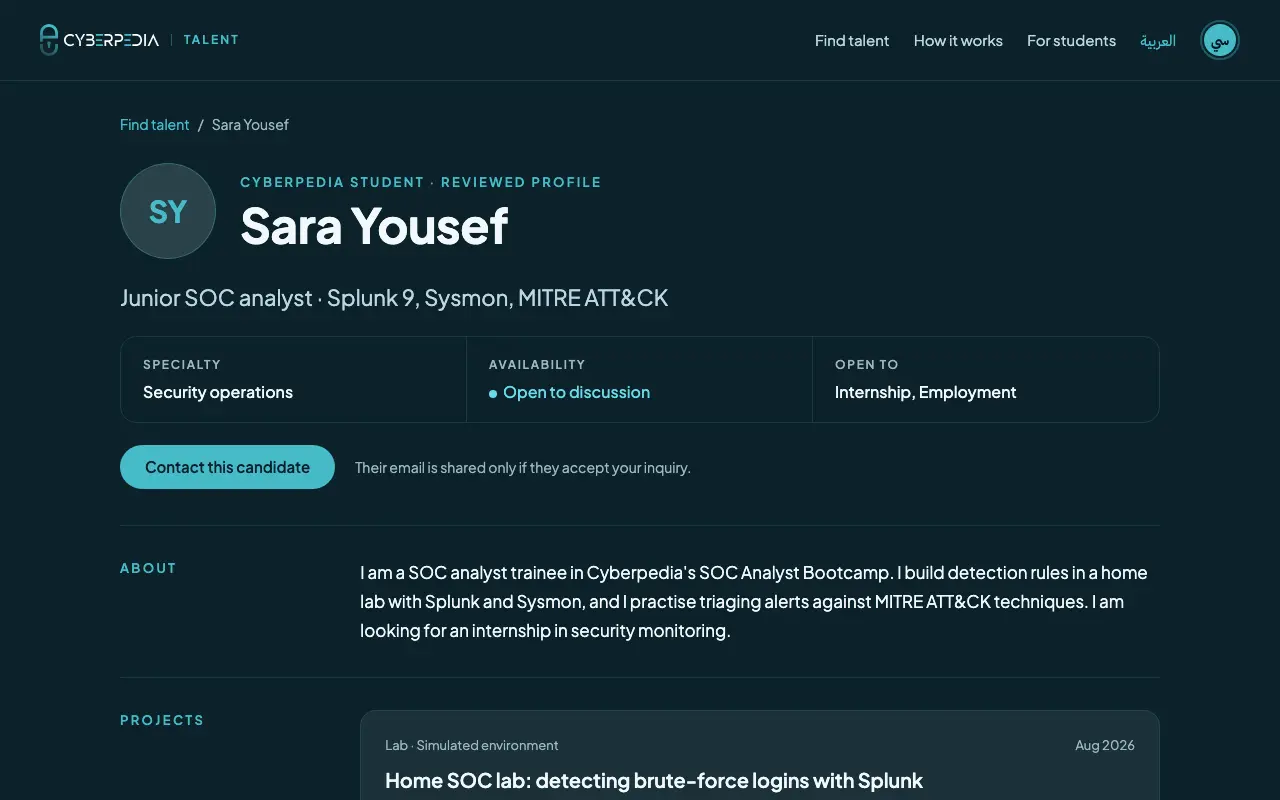
OptionalEmployers find you in "Find talent" and on your own address, for example /en/talent/sara-yousef. They contact you with "Contact this candidate"; your email is never shown.
Step 27: Inquiries from employers
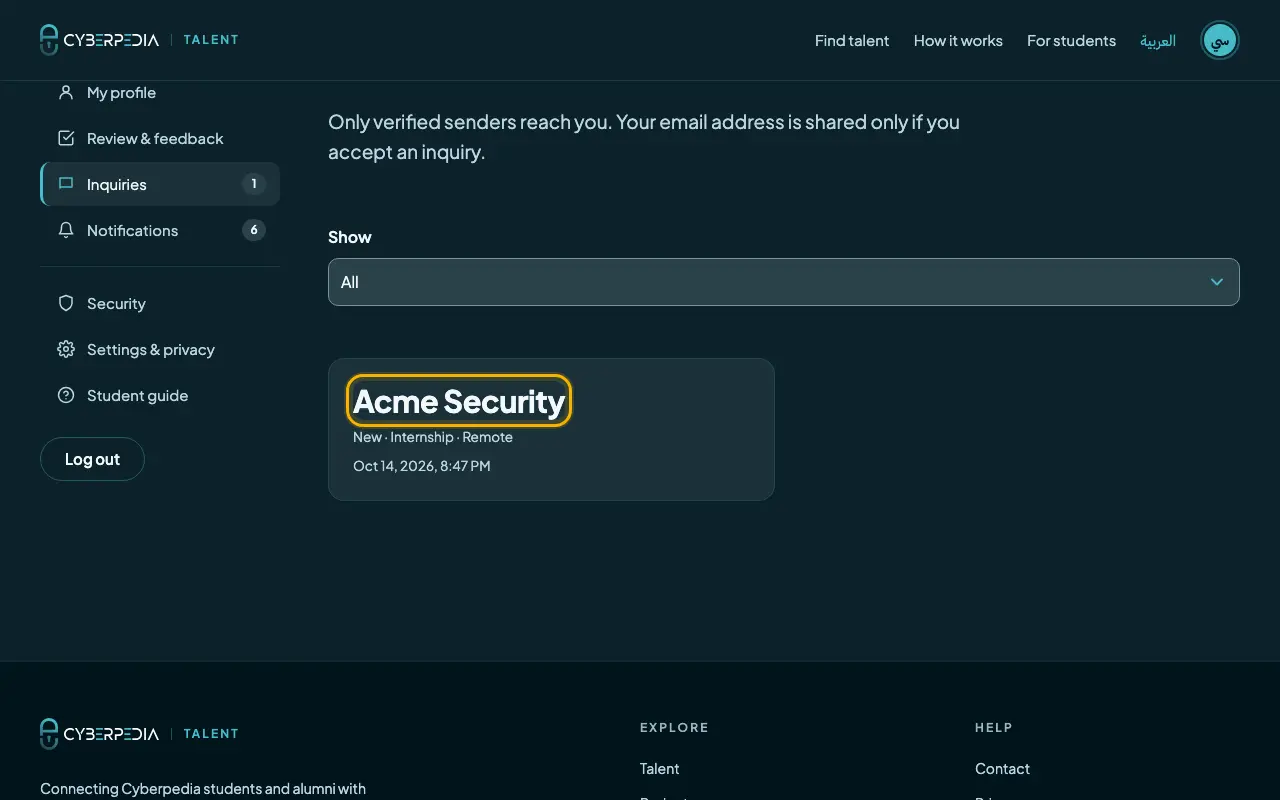
OptionalOnly senders who confirmed their own email reach you. New inquiries appear under "Inquiries", with an email "You have a new inquiry — Cyberpedia Talent".
Step 28: Accept, decline or report
OptionalOpen an inquiry to read it. To reply, tick the agreement and press "Accept and share my address": the sender receives your email. Otherwise press "Decline". You can also report or block a sender.
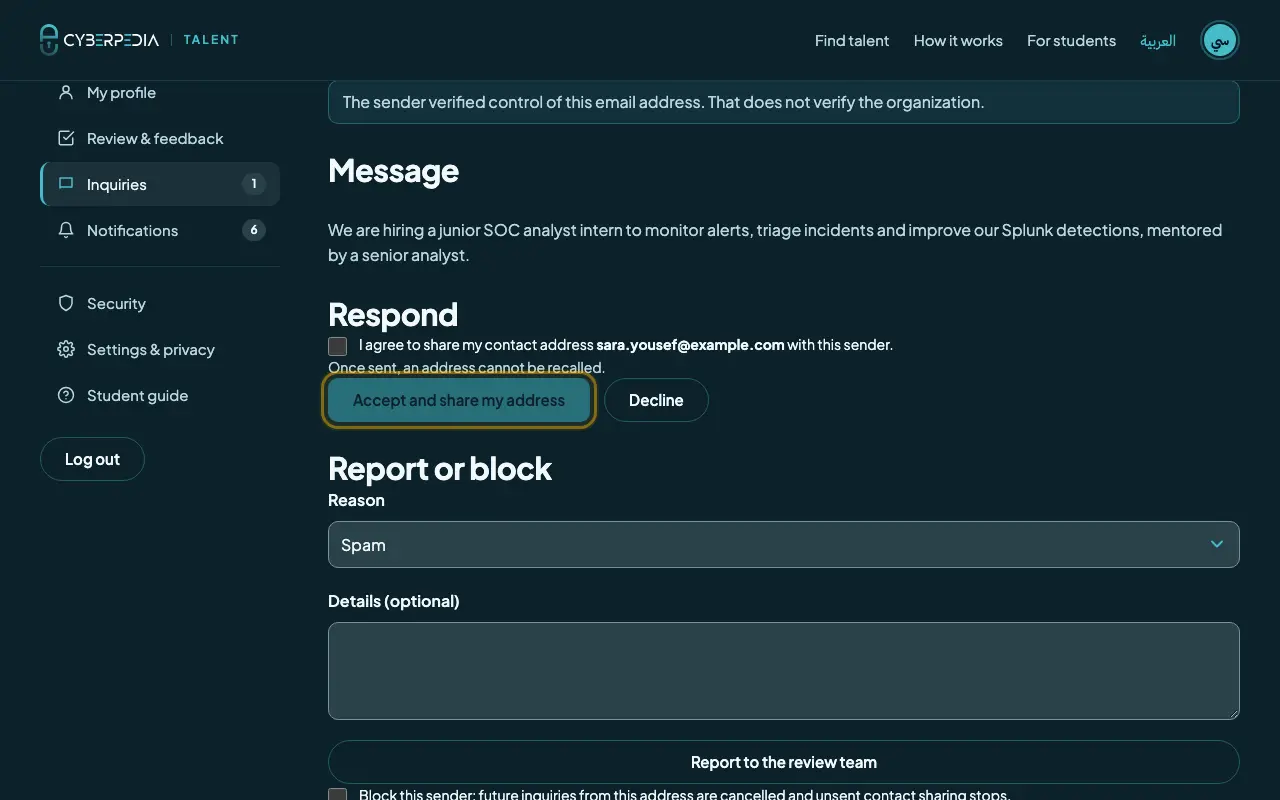
Important A verified email proves the sender controls that address, not that the organization is real. Check the company before sharing more details.
The 10-item checklist
"Review & feedback" shows these items. All ten must be complete before you can submit.
| # | Checklist item | What it needs | Where to fix it |
|---|---|---|---|
| 1 | Name and profile address | Display name and profile handle | Introduction |
| 2 | A complete introduction in Arabic or English | Headline 10+ and About you 80+ characters in one language | Introduction |
| 3 | A specialty | A main specialty, or "Other" with a name | Specialty and skills |
| 4 | At least 3 skills | 3 to 10 skills including your own | Specialty and skills |
| 5 | At least one spoken language | One language with a level | Opportunities and privacy |
| 6 | Opportunity types and work arrangements | At least one of each | Opportunities and privacy |
| 7 | A complete project with permission to share | Title, context, contribution, outcome, month, one tool and the permission box | Projects and labs |
| 8 | Cyberpedia affiliation reference | Relationship and course or cohort, saved | Learning and affiliation |
| 9 | Name any “Other” links | Every "Other" link has a name (done if you have none) | Introduction |
| 10 | Complete any optional records you added | Experience, education and certificates you added are filled in (done if you added none) | Experience · Learning · Certifications |
Troubleshooting
The verification email never arrived
Check Spam and Promotions, wait a few minutes, then use "Resend verification email" on the check-email page. Always open the newest email; the link works for 24 hours.
"The request could not be completed" after several tries
For your protection, repeated attempts are paused for a while. Wait about 15 minutes, then try once more carefully.
"Submit profile for review" is greyed out
The checklist must show 10 / 10 and the consent box must be ticked. Also make sure each name is in the right alphabet.
I cannot edit my profile
A submitted or decided version is locked. Withdraw a pending submission, or press "Create a new draft" on "Review & feedback".
My profile was approved but nobody can see it
Check that "Hide my profile" is not ticked in "Opportunities and privacy", that you did not withdraw publication consent, and that your affiliation is still verified.
My affiliation was rejected
Read the reason under "Affiliation feedback" in "Learning and affiliation", correct your course or cohort, add evidence if you can, and save again. The team checks it again.
Do I need both Arabic and English?
No. One complete language is enough. Adding both helps more employers read your profile.
Is my email address public?
Never. It is shared only with a sender whose inquiry you accept.
Should I turn on two-factor authentication?
It is optional but recommended. Go to "Security", confirm your password and follow "Set up authenticator". Keep your recovery codes somewhere safe.
Still stuck?
Write to the team and describe the step and what you see on the screen. Never send your password.